
Beginners guide to using Mockito and PowerMockito to unit test Java
Background
Lately, I have been writing Java at work, and it is something I haven’t done in years. I have been completely oblivious to the current ecosystem.
When it came time to write some unit tests for the code I was working on I wasn’t given a ton of direction. Our team had classically created overriden classes to perform stubbing. I wasn’t 100% pleased with this so I decided to explore what was out there.
Thus I stumbled across Mockito and PowerMockito and was very happy with the results.
Setup
I have been using Gradle for building at work so that’s what I’m going to use in my example. We need to add these two lines to our dependencies:
testCompile group: 'org.mockito', name: 'mockito-all', version: '1.9.5'
testCompile "org.powermock:powermock-mockito-release-full:1.6.1"
After we refresh gradle, it will pull these dependancies down for testing.
Example Classes
I have a
so enjoy my puppy themed source code ;)
Human.java
public class Human {
    public String name;
    public Puppy puppy;

    public Human(String name) {
        this.name = name;
    }

    public void buyPuppy(String name){
        puppy = Puppy.createPuppy(name, this);
    }

    public void walkWithPuppy() {
        puppy.goOnWalk(15);
    }

    public static void main(String[] args) {
        Human john = new Human("John");
        john.buyPuppy("Gatsby");
        john.puppy.performPuppyTasks();
        john.walkWithPuppy();
    }

    public void isSoHappy() {
        System.out.println("Yay!");
    }
}
Puppy.java
import java.util.Random;

public class Puppy {
    private final String name;
    public Human owner;
    private int energyLevel;
    private Random puppyRandomness;

    public Puppy(String name, Human owner){
        this.name = name;
        this.owner = owner;
        energyLevel = 100;
        puppyRandomness = new Random();
    }

    public static Puppy createPuppy(String name, Human human) {
        human.isSoHappy();
        return new Puppy(name, human);
    }

    public void chaseTail(){
        bark();
        energyLevel -= getRandomInt(10);
    }
    public void bark(){
        System.out.println("WOOF!");
    }

    public void goOnWalk(int length){
        performBusiness();
        energyLevel -= length;
        wipeOffFeet();
    }

    public void wipeOffFeet(){
        System.out.println("Paws on fleek");
    }

    private void performBusiness() {
        System.out.println("When you gotta go you gotta go...");
    }

    public void performPuppyTasks(){
        eat();
        sleep();
        play();
    }

    private void eat(){
        energyLevel+= getRandomInt(10);
    }

    private void sleep() {
        energyLevel+= getRandomInt(10);
    }

    private void play() {
        energyLevel-= getRandomInt(10);
    }

    private int getRandomInt(int bounds){
        return puppyRandomness.nextInt(bounds);
    }

    public String getName() {
        return name;
    }
}
The Test Class
This is the test class. Notice how it extends PowerMockTestCase and how we annotate it with:
@PrepareForTest({Puppy.class})
@RunWith(PowerMockRunner.class)
PuppyTest.java
import org.junit.Before;
import org.junit.Test;
import org.junit.runner.RunWith;
import org.mockito.Mockito;
import org.powermock.api.mockito.PowerMockito;
import org.powermock.core.classloader.annotations.PrepareForTest;
import org.powermock.modules.junit4.PowerMockRunner;
import org.powermock.modules.testng.PowerMockTestCase;
import org.powermock.reflect.Whitebox;

import static org.mockito.Mockito.times;

@PrepareForTest({Puppy.class})
@RunWith(PowerMockRunner.class)
public class PuppyTest extends PowerMockTestCase {

    @Test
    public void testCreatePuppy() throws Exception {
        //Mocking
        Human human = Mockito.mock(Human.class);
        Puppy puppy = Puppy.createPuppy("Woofer", human);
        assert(puppy != null);
        assert(puppy.getName().equals("Woofer"));
        //Verifying
        Mockito.verify(human, times(1)).isSoHappy();

    }

    @Test
    public void testChaseTail() throws Exception {
        Human human = Mockito.mock(Human.class);
        //Spying
        Puppy puppy = Mockito.spy(new Puppy("Woofer", human));
        Mockito.doNothing().when(puppy).bark();
        puppy.chaseTail();
        Mockito.verify(puppy, times(1)).bark();
    }

    @Test
    public void testGoOnWalk() throws Exception {
        Human human = Mockito.mock(Human.class);
        //Power Spying
        Puppy puppy = PowerMockito.spy(new Puppy("Woofer", human));
        PowerMockito.doNothing().when(puppy, "performBusiness");
        //Can combine regular and power
        Mockito.doNothing().when(puppy).wipeOffFeet();
        puppy.goOnWalk(15);
        Mockito.verify(puppy, times(1)).wipeOffFeet();
    }

    @Test
    public void testBuyPuppy() throws Exception {
        //Mocking static
        PowerMockito.mockStatic(Puppy.class);
        Human human = new Human("John");
        Puppy puppy = Mockito.mock(Puppy.class);
        //Static mocking and matchers
        PowerMockito.when(Puppy.createPuppy(Mockito.eq("Woofer"), Mockito.any(Human.class))).thenReturn(puppy);
        human.buyPuppy("Woofer");
        assert(human.puppy != null);
    }

    @Test
    public void testEat() throws Exception {
        Human human = Mockito.mock(Human.class);
        Puppy puppy = PowerMockito.spy(new Puppy("Woofer",human));
        //Get private variables
        int energy = Whitebox.getInternalState(puppy, "energyLevel");
        //Call private methods
        Whitebox.invokeMethod(puppy, "eat");
        int energyAfterwards = Whitebox.getInternalState(puppy, "energyLevel");
        System.out.println(energy + " > " + energyAfterwards);
        assert(energy <= energyAfterwards);
    }
}
Mocking
Mocking is something we do to classes to make our life simplier while unit testing. Essentially, it turns off all the functionality of a class. This is useful when we want to test methods that call functionality on other objects.
Here is a test that uses mocking.
    @Test
    public void testCreatePuppy() throws Exception {
        //Mocking
        Human human = Mockito.mock(Human.class);
        Puppy puppy = Puppy.createPuppy("Woofer", human);
        assert(puppy != null);
        assert(puppy.getName().equals("Woofer"));
        //Verifying
        Mockito.verify(human, times(1)).isSoHappy();
}Notice that we also use Mockito.verify() to verify the method was still called only once even though it does not actually do anything.
Spying
Lets suppose we want a class to do everything it would normally do EXCEPT for one or more specific methods. This is where spying and PowerMockito comes into place. We can spy on an object and specify when methods are called to do other things.
Here is a test using spying.
    @Test
    public void testChaseTail() throws Exception {
        Human human = Mockito.mock(Human.class);
        //Spying
        Puppy puppy = Mockito.spy(new Puppy("Woofer", human));
        Mockito.doNothing().when(puppy).bark();
        puppy.chaseTail();
        Mockito.verify(puppy, times(1)).bark();
}Again, notice that we can still verify that bark was called even though we stubbed it out.
Power spying to stub private methods
Lets suppose we want to spy on an object but we want a private method to do something else. PowerMockito has you covered!
    @Test
    public void testGoOnWalk() throws Exception {
        Human human = Mockito.mock(Human.class);
        //Power Spying
        Puppy puppy = PowerMockito.spy(new Puppy("Woofer", human));
        PowerMockito.doNothing().when(puppy, "performBusiness");
        //Can combine regular and power
        Mockito.doNothing().when(puppy).wipeOffFeet();
        puppy.goOnWalk(15);
        Mockito.verify(puppy, times(1)).wipeOffFeet();
}Notice how on line 8 we are mixing Mockito with PowerMockito. Not only can we do this, it is encouraged. PowerMockito is a permgen memory hog and creates tons of classes. Whenever we can use Mockito over PowerMockito, we should!
Stubbing static methods
Lets suppose you have a class with a static method and we want to stub out its behaviour. PowerMockito has a way to do this.
    @Test
    public void testBuyPuppy() throws Exception {
        //Mocking static
        PowerMockito.mockStatic(Puppy.class);
        Human human = new Human("John");
        Puppy puppy = Mockito.mock(Puppy.class);
        //Static mocking and matchers
        PowerMockito.when(Puppy.createPuppy(Mockito.eq("Woofer"), Mockito.any(Human.class))).thenReturn(puppy);
        human.buyPuppy("Gatsby");
        assert(human.puppy != null);
}Also notice we are specifying that we need the first argument to be “Woofer” but we will accept any Human.class for the second arguement.
Other WhiteBox fun
If you need to access any private members or invoke private methods we can use WhiteBox which is provided with PowerMockito.
    @Test
    public void testEat() throws Exception {
        Human human = Mockito.mock(Human.class);
        Puppy puppy = PowerMockito.spy(new Puppy("Woofer",human));
        //Get private variables
        int energy = Whitebox.getInternalState(puppy, "energyLevel");
        //Call private methods
        Whitebox.invokeMethod(puppy, "eat");
        int energyAfterwards = Whitebox.getInternalState(puppy, "energyLevel");
        System.out.println(energy + " > " + energyAfterwards);
        assert(energy <= energyAfterwards);
    }
On line 8 we invoke the private method “eat”.
We could technically set a private variable via setInternalState(object, “variable”, value) or call a private method with parameters via invokeMethod(object, “privateMethod”, parameter).
Conclusion
So far we have mocked and stubbed via Mockito, mocked and stubbed private methods via PowerMockito, and got into all sorts of trouble with Whitebox. If you are feeling powerful and a bit naughty, I think you are doing it right. You can over abuse these libraries and make tests useless, or you can remove the bare minimum to get appropriate code coverage.
I had a blast learning all of this and I hope you do too. Stay frosty, and try to enjoy unit testing ;)
How I Used Swift to Build a Map Based Location Tracker for iOS
Anything location based is really cool, and having that information displayed on a map is even better! So … lets track our location and plot it on a map :)

The good news about this tutorial is there is very little code! The flip side is, we will have to do some extra setup. Lets begin!
Preface: I’m still very much a beginner to Swift, and I am just sharing my journey to help out other beginners :) I’m also using Xcode beta 5 for this.
Setup
Setting up the project
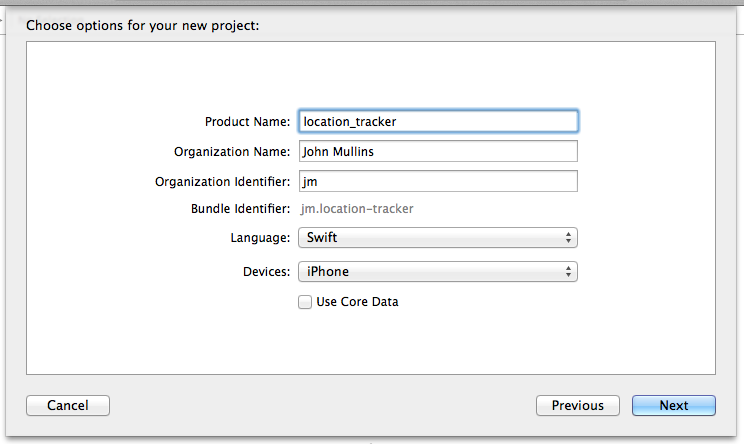
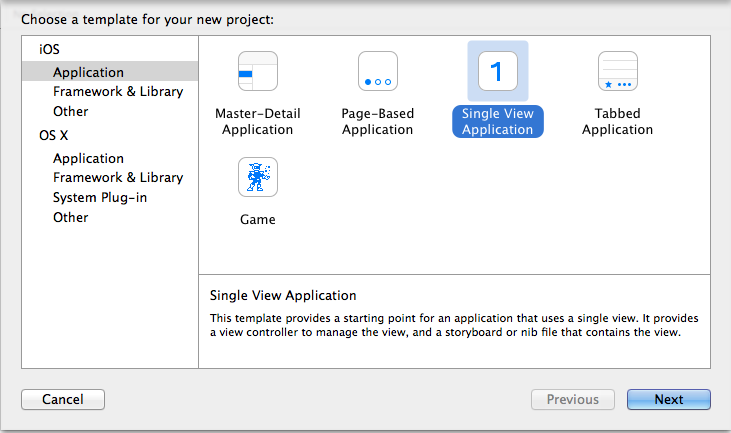
File -> New -> Project
Then select
iOS -> Application -> Single View Application
Give it a name and make sure we are using the language Swift :)
Open our Main.storyboard file.
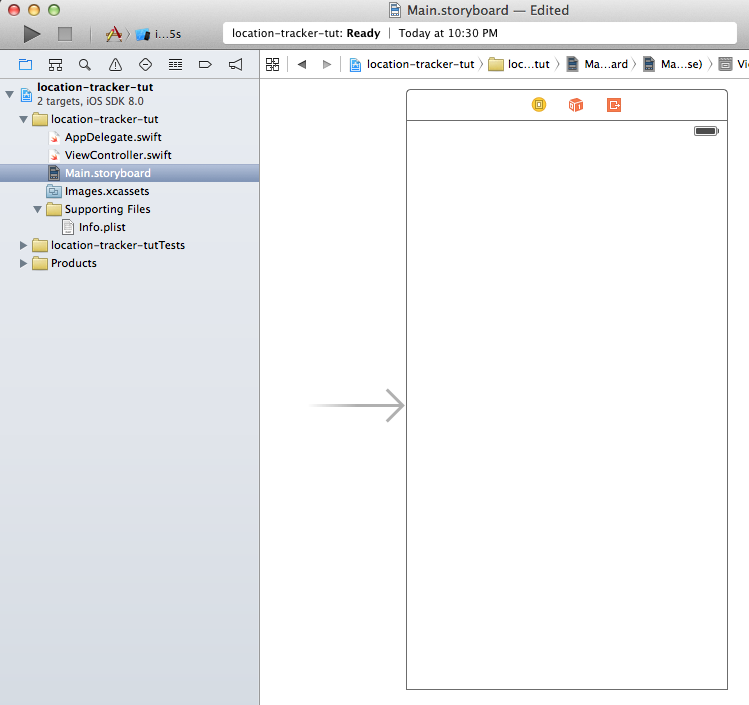
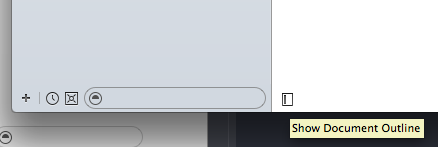
Show the document outline. There is a little handle in the lower left window of the storyboard to do this.
Highlight our View Controller for this scene, and navigate to the attributes inspector.

For this project, we are going to set the size to be “Retina 4-Inch Full Screen” and I’m going to set the Orientation to Portrait.
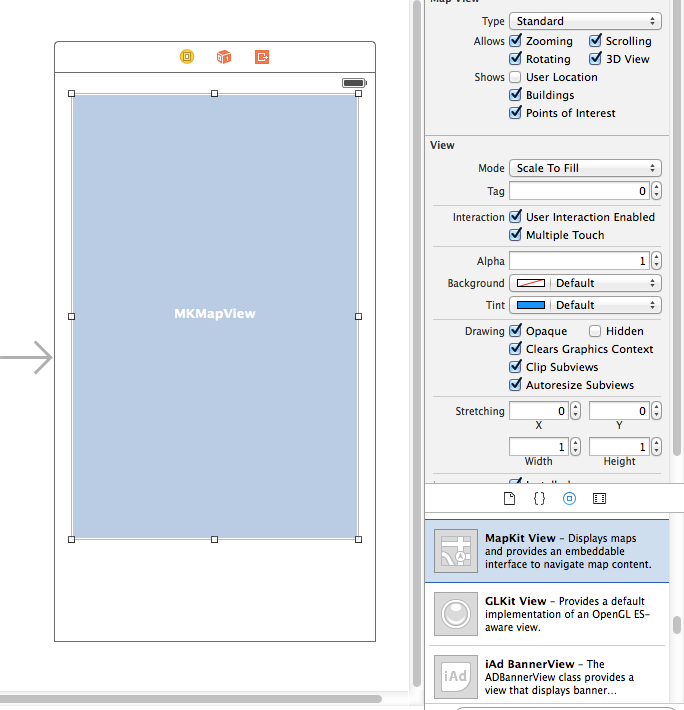
Setting up the MapKit View
Apple has already provided us with a map view. So we just need to drag one into our scene.
Setting up the label
We are also going to have a label to display some debug information about our location. Drag one into the scene as well.
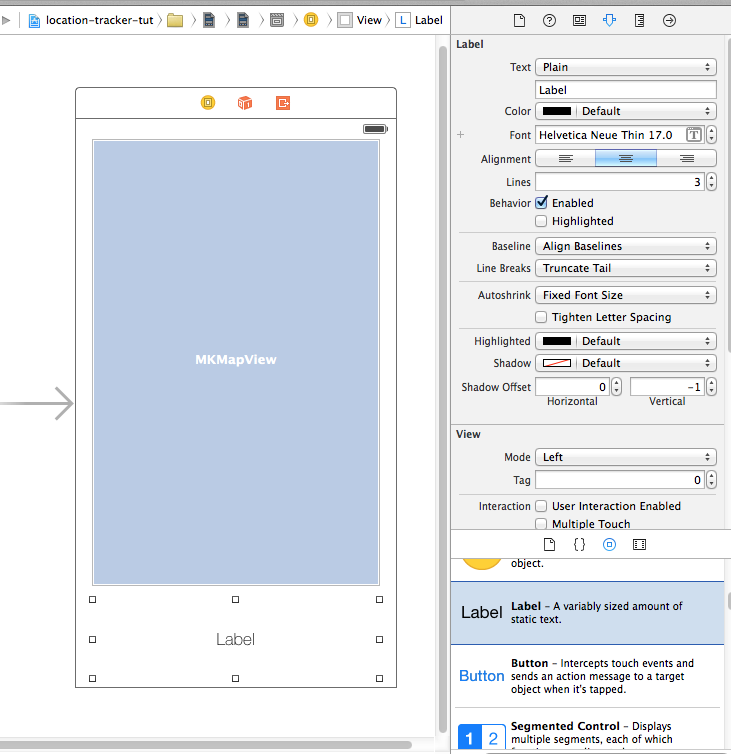
Feel free to adjust the attributes in the inspector to make the label look like mine. I centered the text, gave the label 3 lines, and used the awesomely cool font ‘Helvetica Neue Thin’ with a font size of 12 (incorrectly “17.0” in screen shot).
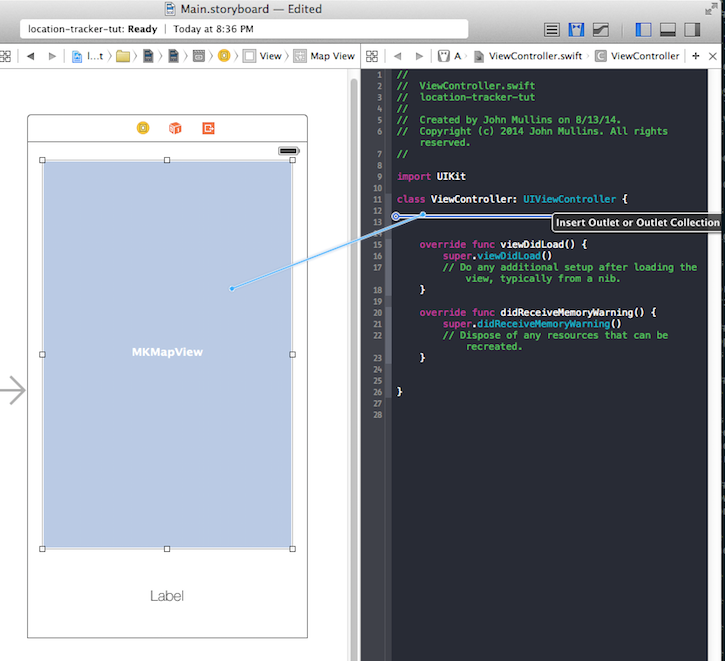
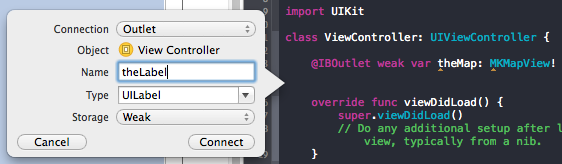
Creating the IBOutlets
Now that we have our mapview and label, we are going to drag them into our ViewController.swift code so we can control them with code.
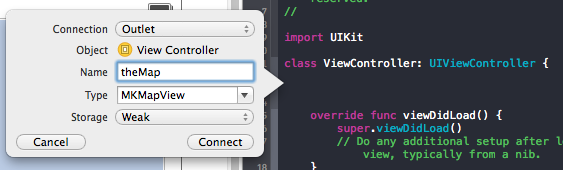
We want to switch to assistant editor (the view that looks like a suit and bow tie in the upper right), and then “right click drag” our MKMapView into our ViewController.swift file.
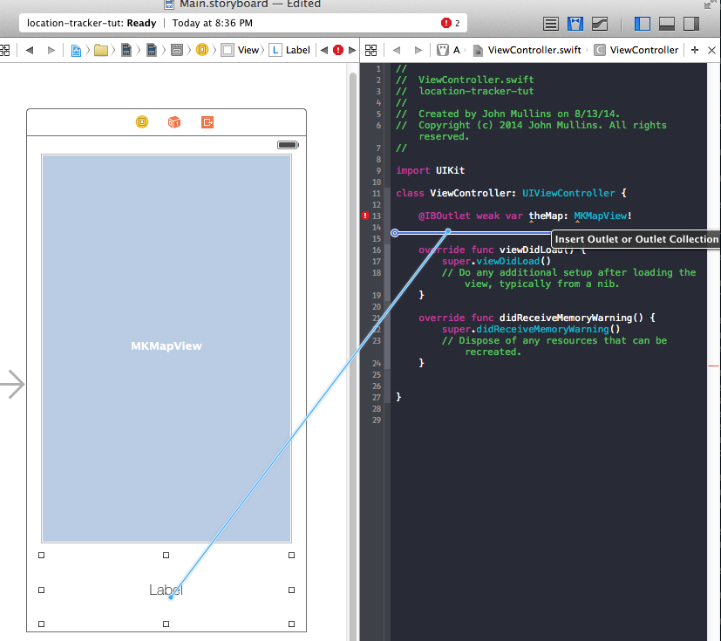
We also want to right click, and drag from the Label to our ViewController.swift file.
You will see some errors, but this will go away once we fix our imports. If you are dying to fix this now, add this under import UIKit
import CoreLocation
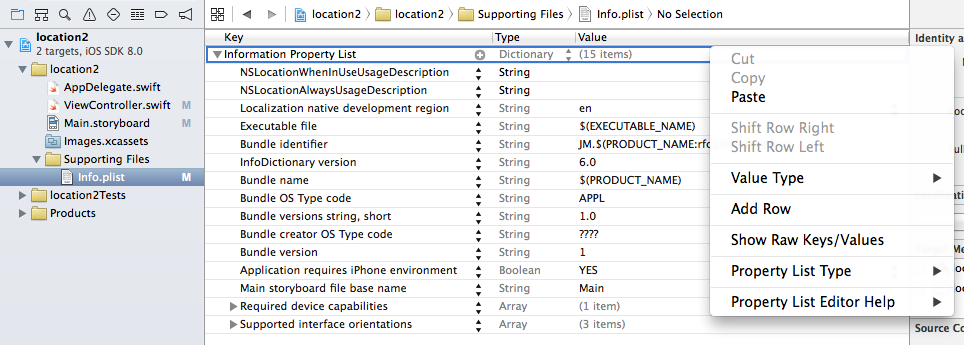
import MapKitEditing the info.plist
We need to add 2 keys to our info.plist file, which is located in the “Supporting Files” folder. The two keys are NSLocationWhenInUseUsageDescription and NSLocationAlwaysUsageDescription. Right click on “Information Property List”, click Add Row, and manually enter these two keys.
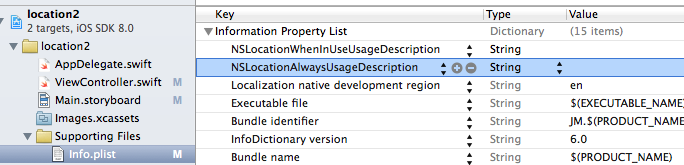
The final form should look like this:
Simulating your location
The last thing I want to mention is there is no way (I saw) to have the iOS simulator aware of your actual location. However, the simulator DOES allow you to fake this data. Make sure you have a good simulation selected or else this program will just show an empty map.
Once you have the simulator going select a location!!!

ViewController.swift and Full Code
Phew! Thank goodness all that setup is out of the way. Time for the code!
Inheritance & Initial variables
class ViewController: UIViewController, CLLocationManagerDelegate, MKMapViewDelegate {CCLocationManagerDelegate and MKMapViewDelegate as classes we are inheriting from.
If you feel comfortable with the concept of inheritance, try holding the command key and clicking on MKMapViewDelegate or CCLocationManagerDelegate to get a list of methods that we can use.
If you are not comfortable, its not that important for this tutorial.
    @IBOutlet weak var theMap: MKMapView!
    @IBOutlet weak var theLabel: UILabel!

    var manager:CLLocationManager!
var myLocations: [CLLocation] = []We create a manager of type CLLocationManger and since we are not giving it an initial value, we make it an optional with the ! mark.
Per Apple’s definition: “Optionals say either “there is a value, and it equals x” or “there isn’t a value at all”. Optionals are similar to using nil with pointers in Objective-C, but they work for any type, not just classes. Optionals are safer and more expressive than nil pointers in Objective-C and are at the heart of many of Swift’s most powerful features.”
We also set up an array of CLLocation’s and name that myLocations. This is where we are going to store every location we go to. I initialize it as an empty array, so no need for an optional here :)
viewDidLoad
For the sake of this app, this functions acts as our entry point to the entire program. Technically, this function is called when the view is done loading.
    override func viewDidLoad() {
        super.viewDidLoad()

        //Setup our Location Manager
        manager = CLLocationManager()
        manager.delegate = self
        manager.desiredAccuracy = kCLLocationAccuracyBest
        manager.requestAlwaysAuthorization()
manager.startUpdatingLocation()CLLocationManager. Basically, this guy is responsible for knowing where we are at all times … physically. We use a delegate so we can take advantage of a function that gets called every time our location is updated:locationManager(manager:CLLocationManager, didUpdateLocations locations:[AnyObject])
There are various desiredAccuracy’s we can use, but we want this accurate to within 5 meters, so we are using kCLLocationAccuracyBest.
When we call manager.requestAlwaysAuthorization you will get a little popup on your iOS device that will ask for permission so that the app will know our location. I encourage you to say yes to this ;)
Finally, we call manager.startUpdatingLocation() which actually starts checking if we change locations or not. If we change locations, it will call:
locationManager(manager:CLLocationManager, didUpdateLocations locations:[AnyObject])
        //Setup our Map View
        theMap.delegate = self
        theMap.mapType = MKMapType.Satellite
        theMap.showsUserLocation = true
}MapKitView here. We are delegating ourself so we can later specify how to render our overlays. Overlays are anything that sits on top of the map. In our case, the lines we draw will be overlays.
Our map type is Satellite but you can also choose MKMapType.Standard and MKMapType.Hybrid much like you would the Maps app on our iPhones.
The variable showsUserLocation will add the blinking blue dot to our map to show where we currently are.
locationManager didUpdateLocation
As one might guess, this function gets called every time our location changes.
    func locationManager(manager:CLLocationManager, didUpdateLocations locations:[AnyObject]) {
        theLabel.text = "\(locations[0])"
        myLocations.append(locations[0] as CLLocation)
The first thing we do is update theLabel’s text with the details about our location. This will show all the interesting details at the bottom of our app including our longitude, latitude, how fast we are moving, and details about what time it is.
Notice how locations is an array of CLLocation’s. In my experimentations, it seems like this array always only has 1 value. This is why I’m accessing the 0th (first) index of the array. I imagine this might have multiple values if we are tracking more than one object. If anyone would like to enlighten me, that would be great :)
We add this location to the array we created for holding all of our locations named myLocations.
        let spanX = 0.007
        let spanY = 0.007
        var newRegion = MKCoordinateRegion(center: theMap.userLocation.coordinate, span: MKCoordinateSpanMake(spanX, spanY))
theMap.setRegion(newRegion, animated: true)theMap.userLocation.coordinate. The span refers to how zoomed in we actually are in the region. Feel free to play around with these numbers. They felt right to me, shaken.. not stirred.
        if (myLocations.count > 1){
            var sourceIndex = myLocations.count - 1
var destinationIndex = myLocations.count - 2myLocations. I set up the index’s to use to make the code easier to read.
            let c1 = myLocations[sourceIndex].coordinate
            let c2 = myLocations[destinationIndex].coordinate
var a = [c1, c2]coordinate method for CLLocation returns a CLLocationCoordinate2D. With this we can create a line between the two points. We are creating an array out of the points we want to draw lines between with my poorly named variable a.
            var polyline = MKPolyline(coordinates: &a, count: a.count)
            theMap.addOverlay(polyline)
        }
    }
MKPolyline has some interesting syntax, but it basically needs a pointer to an array of CLLocationCoordinate2D’s which happens to be our array a. So I pass a reference to this pointer with the & symbol. Pointers and references are a big topic that I will not be digging into with this tutorial, but I encourage you to do some research on this topic.
Finally, we add our polyline to the theMap as an overlay.
We are not quite done yet, even tho we added the line to the map, the map has no idea how to actually draw it. We have to specify a renderer for it, which we will talk about next.
mapView rendererForOverlay
We are inheriting this method from our MKMapView delegation. This method will be called whenever the MKMapKitView has to render an overlay.
    func mapView(mapView: MKMapView!, rendererForOverlay overlay: MKOverlay!) -> MKOverlayRenderer! {

if overlay is MKPolyline {MKPolyline. If you are rendering things that are not polyline’s we use a different type of renderer.
var polylineRenderer = MKPolylineRenderer(overlay: overlay)MKPolylineRenderer and passing out overlay to it. In our case, it is the polyline we created in the didUpdateLocation. There are different renderers for different things.
            polylineRenderer.strokeColor = UIColor.blueColor()
            polylineRenderer.lineWidth = 4
            return polylineRenderer
        }
        return nil
}polylineRender. In our case, if the overlay is not a MKPolyline we are returning nil.
Conclusion
Well, that was a lot of fun and I’m really happy with the results. I was watching that little car drive around the whole time I was writing this tutorial. I don’t know what sorta freeways let you go 30 mph, but whatever ;)
We can do a lot with this framework. One thing I was doing by accident at first was using Apple’s MKDirections API to ask for directions between the two locations to draw a line before I realized I didn’t have to do that at all. I actually had the code mostly working, but maybe I will save that for a tutorial some other day.
Anyhoo, hope this is useful and I hope you all enjoy learning Swift as much as I am :)
How I used Swift to build a simple touch game for iOS
Intro
How the heck do you make a simple touch game for iOS in Swift? I wasn’t quite sure, so I made this:
Let me show you how I built this, and share some gotcha’s that I’ve learnt along the way :)
Preface: I have only been doing Swift (in my leisure) for about a week now. I am sure there are better ways to do most of things shown here. I thought that sharing my journey as a beginner would be helpful for other people learning the language.
Initial Game Design
Initially, I spent some time trying to think of what kind of game I’d be capable of making that wouldn’t be that difficult to write a tutorial about, but also something that could act as a stepping stone towards a real game.
So the basic game design for Kamikaze type game I’m gonna call “Kamakazee” ended up as the following:
- Spawn planes/ship at the top of the screen
- Have them fly towards the bottom of the screen at an increasing pace.
- Touch the ships to have them destroyed/disappear.
- Show a score screen after 5 ships have crashed.
- Give the ability to retry and start over.
I have done some game dev before, but most of my work has been done in Unity with C#. Surprisingly, a lot of the concepts from Unity carry over to Swift quite nicely :)
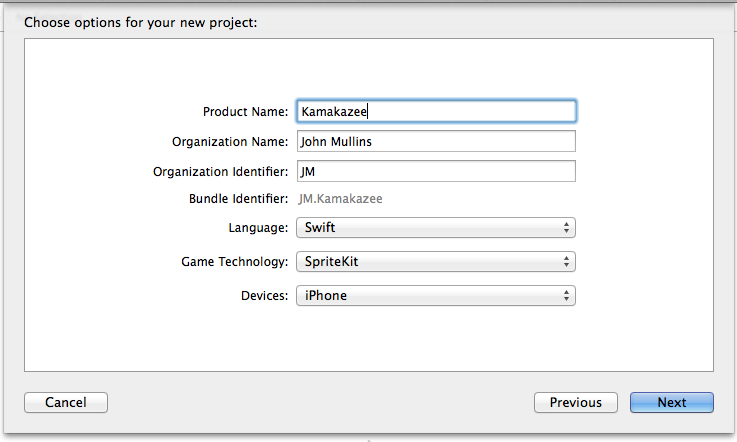
Setting up our project
Lets create our project.
File -> New -> Project
Then select …
iOS -> Application -> Game
Make sure we are using Swift as our language, SpriteKit as our technology, and iPhone as our Device.
A Sprite is defined as a two-dimensional pre-rendered figure. Thus, SpriteKit will be our best choice for most 2D games. I hope to cover SceneKit, OpenGL ES, and Metal in future tutorials.
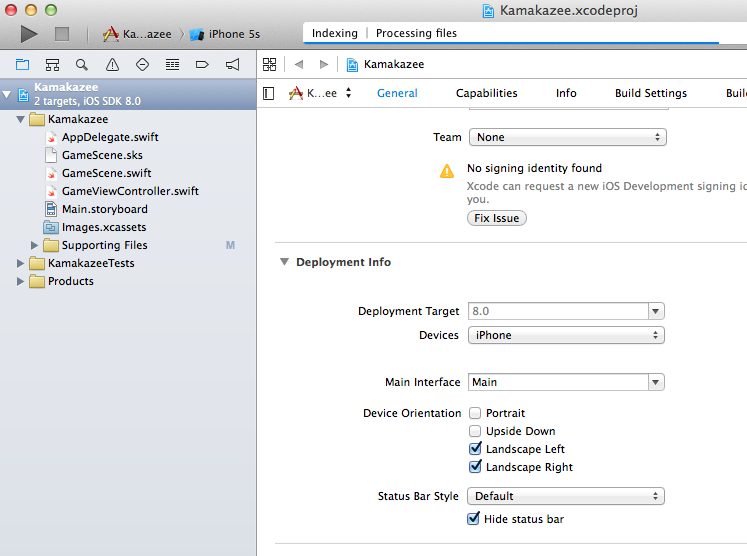
On the general tab, in our project settings, make sure we have portrait and upside down unselected for device orientation. We only want the user to be able to play this in landscape view.
Thats it! We are going to use Apple’s SpaceShip graphic that already comes with the default project, so no need to import any artwork. I encourage you to try adding graphics on your own.
PS -Friend’s faces work the best ;)
GameScene.swift - Complete Code
Lets open our GameScene.swift file.
Here is our complete game code. Yes, its a bit longer than my previous tutorials, but we are doing a lot of things. Don’t worry, I will fully explain EVERYTHING.
import SpriteKit
class GameScene: SKScene {
var score = 0
var health = 5
var gameOver : Bool?
let maxNumberOfShips = 10
var currentNumberOfShips : Int?
var timeBetweenShips : Double?
var moverSpeed = 5.0
let moveFactor = 1.05
var now : NSDate?
var nextTime : NSDate?
var gameOverLabel : SKLabelNode?
var healthLabel : SKLabelNode?
/*
Entry point into our scene
*/
override func didMoveToView(view: SKView) {
initializeValues()
}
/*
Sets the initial values for our variables.
*/
func initializeValues(){
self.removeAllChildren()
score = 0
gameOver = false
currentNumberOfShips = 0
timeBetweenShips = 1.0
moverSpeed = 5.0
health = 5
nextTime = NSDate()
now = NSDate()
healthLabel = SKLabelNode(fontNamed:"System")
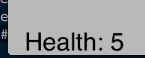
healthLabel?.text = "Health: \(health)"
healthLabel?.fontSize = 30
healthLabel?.fontColor = SKColor.blackColor()
healthLabel?.position = CGPoint(x:CGRectGetMinX(self.frame) + 80, y:(CGRectGetMinY(self.frame) + 100));
self.addChild(healthLabel)
}
/*
Called before each frame is rendered
*/
override func update(currentTime: CFTimeInterval) {
healthLabel?.text="Health: \(health)"
if(health <= 3){
healthLabel?.fontColor = SKColor.redColor()
}
now = NSDate()
if (currentNumberOfShips < maxNumberOfShips &&
now?.timeIntervalSince1970 > nextTime?.timeIntervalSince1970 &&
health > 0){
nextTime = now?.dateByAddingTimeInterval(NSTimeInterval(timeBetweenShips!))
var newX = Int(arc4random()%1024)
var newY = Int(self.frame.height+10)
var p = CGPoint(x:newX,y:newY)
var destination = CGPoint(x:newX, y:0.0)
createShip(p, destination: destination)
moverSpeed = moverSpeed/moveFactor
timeBetweenShips = timeBetweenShips!/moveFactor
}
checkIfShipsReachTheBottom()
checkIfGameIsOver()
}
/*
Creates a ship
Rotates it 90º
Adds a mover to it go downwards
Adds the ship to the scene
*/
func createShip(p:CGPoint, destination:CGPoint) {
let sprite = SKSpriteNode(imageNamed:"Spaceship")
sprite.name = "Destroyable"
sprite.xScale = 0.5
sprite.yScale = 0.5
sprite.position = p
let duration = NSTimeInterval(moverSpeed)
let action = SKAction.moveTo(destination, duration: duration)
sprite.runAction(SKAction.repeatActionForever(action))
let rotationAction = SKAction.rotateToAngle(CGFloat(3.142), duration: 0)
sprite.runAction(SKAction.repeatAction(rotationAction, count: 0))
currentNumberOfShips?+=1
self.addChild(sprite)
}
/*
Called when a touch begins
*/
override func touchesBegan(touches: NSSet, withEvent event: UIEvent) {
for touch: AnyObject in touches {
let location = (touch as UITouch).locationInNode(self)
if let theName = self.nodeAtPoint(location).name {
if theName == "Destroyable" {
self.removeChildrenInArray([self.nodeAtPoint(location)])
currentNumberOfShips?-=1
score+=1
}
}
if (gameOver?==true){
initializeValues()
}
}
}
/*
Check if the game is over by looking at our health
Shows game over screen if needed
*/
func checkIfGameIsOver(){
if (health <= 0 && gameOver == false){
self.removeAllChildren()
showGameOverScreen()
gameOver = true
}
}
/*
Checks if an enemy ship reaches the bottom of our screen
*/
func checkIfShipsReachTheBottom(){
for child in self.children {
if(child.position.y == 0){
self.removeChildrenInArray([child])
currentNumberOfShips?-=1
health -= 1
}
}
}
/*
Displays the actual game over screen
*/
func showGameOverScreen(){
gameOverLabel = SKLabelNode(fontNamed:"System")
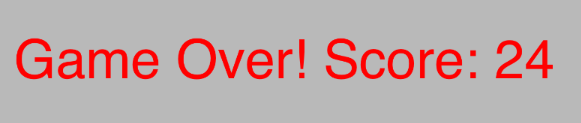
gameOverLabel?.text = "Game Over! Score: \(score)"
gameOverLabel?.fontColor = SKColor.redColor()
gameOverLabel?.fontSize = 65;
gameOverLabel?.position = CGPoint(x:CGRectGetMidX(self.frame), y:CGRectGetMidY(self.frame));
self.addChild(gameOverLabel)
}
}Top level variables
We declare a lot of variables at the top of our code. Lets take a look at each one.
var score = 0
var health = 5One thing I discovered, is if you set the text of a label to be the value of an optional variable it will literally display “(Optional)” on the screen. Since we are displaying these values, I am not making them optional. I’d love if someone could describe a work around for this use case.
var gameOver : Bool?This variable will be set it to true if the game is over and we are showing the score screen. It will be false while we are playing the game.
let maxNumberOfShips = 10
var currentNumberOfShips : Int?To ensure this, we will create a variable named currentNumberOfShips which will keep track of how many ships are currently on the screen.
var timeBetweenShips : Double?
var moverSpeed = 5.0
let moveFactor = 1.05moverSpeed is how long it takes for our ship to fly to the bottom of the screen.
After each plane spawns, we will divide timeBetweenShips and moverSpeed by our moveFactor. I came up with this number through experimentation, it just felt right :)
var now : NSDate?
var nextTime : NSDate?var gameOverLabel : SKLabelNode?
var healthLabel : SKLabelNode?The gameOverLabel will be shown when the game is over.
The healthLabel will show our health in the lower left hand corner of the screen.
didMoveToView
This is an overridden function from SKScene that acts as our entry point into our game.
Simply put, this code gets called first.
More specifically, this function is fired immediately after a view is presented. If we had more than one view, they would be fired in whatever order the views were shown.
We use this to call our initializeValues functions.
  override func didMoveToView(view: SKView) {
        initializeValues()
    }
initializeValues
There is a principle in programming called DRY or Don’t Repeat Yourself.
I was initially initializing my variables in 3 places, so to DRY up my code I created this function.
    func initializeValues(){
self.removeAllChildren() score = 0
gameOver = false
currentNumberOfShips = 0
timeBetweenShips = 1.0
moverSpeed = 5.0
health = 5
nextTime = NSDate()
now = NSDate()It is worth noting that moverSpeed and timeBetweenShips is in seconds.
        healthLabel = SKLabelNode(fontNamed:"System")
        healthLabel?.text = "Health: \(health)"
        healthLabel?.fontSize = 30
        healthLabel?.fontColor = SKColor.blackColor()
healthLabel?.position = CGPoint(x:CGRectGetMinX(self.frame) + 80, y:(CGRectGetMinY(self.frame) + 100));We set up which font to use, what the text should say, what font size to use, and what color our font should be.
The last line sets the position of our text. Notice that I’m using CGRectGetMinX to find the left side of the screen, and I’m using CGRectGetMinY to find the bottom. The values 80 and 100 are just used as offsets so our label is not hidden off of the screen.
        self.addChild(healthLabel)
}Lets talk about that function next.
update
This is another function overridden by SKScene. update gets called for every frame we draw. If we are running our game at 60 frames per second, this function is being called 60 times during that second.
It is worth considering any performance impact that might occur for any code you place here.
    override func update(currentTime: CFTimeInterval) {

        healthLabel?.text="Health: \(health)"
        if(health <= 3){
            healthLabel?.fontColor = SKColor.redColor()
}I also added some fun code that will change the color of our healthLabel from black to red if the players health drops to 3. Its a good way to call attention to the user subtly and tells them to be careful!.
Next, lets check to see if we can create a ship!
        now = NSDate()
if (currentNumberOfShips < maxNumberOfShips && now?.timeIntervalSince1970 > nextTime?.timeIntervalSince1970 && health > 0){ nextTime = now?.dateByAddingTimeInterval(NSTimeInterval(timeBetweenShips!))The first thing we do is specify when the next ship can be made. We do this by adding a some time to our now value and assigning it to nextTime.
            var newX = Int(arc4random()%1024)
            var newY = Int(self.frame.height+10)
            var p = CGPoint(x:newX,y:newY)
var destination = CGPoint(x:newX, y:0.0)I had a difficult time trying to pass self.frame.width to arc4random, so I moved on. If anyone has any ideas, please let me know :)
The Y value for our spawn point is the self.frame height + 10. The 10 part is to provide it some buffer room.
The destination will have the same x value as our spawn point, but the y value is simply 0.
            createShip(p, destination: destination)

            moverSpeed = moverSpeed/moveFactor
            timeBetweenShips = timeBetweenShips!/moveFactor
        }
We also divide our moverSpeed and timeBetweenShips by moveFactor, which will make our ships spawn faster and faster!
        checkIfShipsReachTheBottom()
        checkIfGameIsOver()
}createShip
    func createShip(p:CGPoint, destination:CGPoint) {
        let sprite = SKSpriteNode(imageNamed:"Spaceship")
        sprite.name = "Destroyable"
        sprite.xScale = 0.5
        sprite.yScale = 0.5
sprite.position = pNext, we give the sprite some values. I’m specifying its name value as “Destroyable” to identify it as a destroyable object. This part will make more sense in our touchesBegan() function.
        let duration = NSTimeInterval(moverSpeed)
        let action = SKAction.moveTo(destination, duration: duration)
        sprite.runAction(SKAction.repeatActionForever(action))
We tell our sprite to run this action, and to repeat forever.
        let rotationAction = SKAction.rotateToAngle(CGFloat(3.142), duration: 0)
sprite.runAction(SKAction.repeatAction(rotationAction, count: 0))To fix this, I create another SKAction but this time I use rotateToAngle. The first value it accepts is a radian value. I know that I want to rotate the ship 180º, but I wasn’t sure what the radian value for it. To be honest, I asked Google.
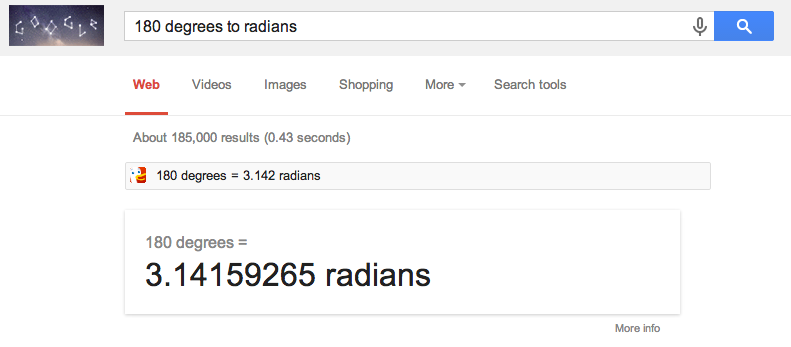
It is interesting that this is the value of Pi. I might need to revisit my grade school Geometry books again :)
It is also worth noting that I wanted this rotation to happen instantly, so I set the duration to 0 and the amount of times to repeat the action to 0.
        currentNumberOfShips?+=1
        self.addChild(sprite)
}touchesBegan
touchesBegan is another overloaded method from SKScene. It is called whenever touching happens in our scene. We already know what we want this method to do. We want it to destroy ships we touch or restart our game.
    override func touchesBegan(touches: NSSet, withEvent event: UIEvent) {
for touch: AnyObject in touches { let location = (touch as UITouch).locationInNode(self)
if let theName = self.nodeAtPoint(location).name {Notice how we have put our let statement in an if. This will allow us to avoid any problems we might have if no nodes exist at this point. The condition is only met if we can get a node and a name value from the touched location.
                if theName == "Destroyable" {
                    self.removeChildrenInArray([self.nodeAtPoint(location)])
                    currentNumberOfShips?-=1
                    score+=1
                }
}We pass removeChildInArray an array that contains only one node in it, however we could have built an array and sent a single command after we iterated through all the touches. I encourage you to try this as an exercise.
Since we are destroying a ship, we decrease currentNumberOfShips and increase our score!
            if (gameOver?==true){
                initializeValues()
            }
        }
}checkIfGameIsOver
If you remember, this function is called every time update() is called.
    func checkIfGameIsOver(){
        if (health <= 0 && gameOver == false){
            self.removeAllChildren()
            showGameOverScreen()
            gameOver = true
        }
}If it is, we remove everything in the scene, display the game over screen, and set game over to true.
checkIfShipsReachTheBottom
This function is also called every time update() is called.
    func checkIfShipsReachTheBottom(){
        for child in self.children {
            if(child.position.y == 0){
                self.removeChildrenInArray([child])
                currentNumberOfShips?-=1
                health -= 1
            }
        }
}Another thing we could do here is check if “Destroyable” is the name of the child. I encourage you to try this.
showGameOverScreen
Finally, this function will display our game over screen.
    func showGameOverScreen(){
        gameOverLabel = SKLabelNode(fontNamed:"System")
        gameOverLabel?.text = "Game Over! Score: \(score)"
        gameOverLabel?.fontColor = SKColor.redColor()
        gameOverLabel?.fontSize = 65;
        gameOverLabel?.position = CGPoint(x:CGRectGetMidX(self.frame), y:CGRectGetMidY(self.frame));
        self.addChild(gameOverLabel)
}Conclusion
Sweeet! We’ve written our first game in Swift. At least, it was MY first game with Swift. The game is a little boring, and ends rather quickly, however we know know how to set up 2D sprite games, and how to click and interact with the objects inside of them.
There are many things we could do to make this game better.
Sound. Everything is better with sound effects and music.
Common game design convention states that if we give the user a button, we should give them a reason to not press it. Our game does not support this yet. For homework, we could try decrementing the score every time a ship is missed.
Instead of going straight down, our ships could fly diagonally or follow curves like sine waves. This would be much more difficult and probably more fun.
We could put an actual battleship at the bottom of the screen and give the player a sense of identity.
We could add explosions and various other game juice. You would be surprised what some subtle screen shake and particle engines can add to a relatively boring game.
Anyways, I hope you enjoyed this tutorial. If you have any suggestions for future tutorials or just advice how to make my code better, please feel free to leave a comment. Thanks for you time, and enjoy learning Swift!
How I used Swift to build a Menubar App for OSX
You know those menubar apps that sit next to our date/time in the top right corner of OSX?

Yeah, I think those are cool. Lets make one! :)
I should preface this tutorial by saying that I’ve only been learning Swift for about a week, I’m using Xcode beta4, and I’m sure there are far better ways of accomplishing this task. I simply wanted to share what I’ve learnt with other beginners (like myself).
Setting up the project
File -> New -> Project -> OSX -> Application -> Cocoa Application
Give it a cool name (I chose ‘menubar tut’ cuz I’m not THAT cool), and make sure you have selected Swift as the language to use.
Setting up our window
Click on MainMenu.xib, then click on the menu bar window…

… and you should get a view of our empty application.
Add a label
To add a label, we need to grab one from our objects folder, and drag it into the scene.

Resize to taste, and feel free to pick a cool font for it in the inspector if you are feeling creative.
Add a button
Do the same for a button, rename it to something amazing like “Press me!”

Drag IBOutlets into AppDelegate
Next, we want to switch to assistant editor (the view that looks like a suit and bow tie in the upper right), and then “right click drag” our label and button into our AppDelegate.swift file.

For the label we just use a outlet.

For the button we actually want to create both an outlet and an action.


TL:DR Code
Note: If you are just planning on copy/pasting and then splitting…. make sure you read the visibility section below. You have to manually mess with your info.plist file for it to fully work.
Here is the full code. I will proceed to break down each part aftwards.
import Cocoa

class AppDelegate: NSObject, NSApplicationDelegate {

    @IBOutlet weak var window: NSWindow!
    @IBOutlet weak var theLabel: NSTextField!
    @IBOutlet weak var theButton: NSButton!

    var buttonPresses = 0;

    var statusBar = NSStatusBar.systemStatusBar()
    var statusBarItem : NSStatusItem = NSStatusItem()
    var menu: NSMenu = NSMenu()
    var menuItem : NSMenuItem = NSMenuItem()

    override func awakeFromNib() {
        theLabel.stringValue = "You've pressed the button \n \(buttonPresses) times!"

        //Add statusBarItem
        statusBarItem = statusBar.statusItemWithLength(-1)
        statusBarItem.menu = menu
        statusBarItem.title = "Presses"

        //Add menuItem to menu
        menuItem.title = "Clicked"
        menuItem.action = Selector("setWindowVisible:")
        menuItem.keyEquivalent = ""
        menu.addItem(menuItem)
    }

    func applicationDidFinishLaunching(aNotification: NSNotification?) {
        self.window!.orderOut(self)
    }

    @IBAction func buttonPressed(sender: NSButton) {
        buttonPresses+=1
        theLabel.stringValue = "You've pressed the button \n \(buttonPresses) times!"
        menuItem.title = "Clicked \(buttonPresses)"
        statusBarItem.title = "Presses \(buttonPresses)"
    }

    func setWindowVisible(sender: AnyObject){
        self.window!.orderFront(self)
    }
}
StatusBar’s, StatusItem’s, Menu’s, MenuItem’s
The hardest part for me was wrapping my brain around the nested qualities of StatusBar’s and Menu’s.
Basically, StatusBar’s (the things in the Menubar) have StatusItems (things you can click), and Menu’s have MenuItem’s. We need all these things to accomplish a little pulldown menu.
How do you put these together? Well, StatusItems CAN be a NSMenu.
So, before all my function declarations, I initialze everything we need upfront.
var statusBar = NSStatusBar.systemStatusBar()
var statusBarItem : NSStatusItem = NSStatusItem()
var menu: NSMenu = NSMenu()
var menuItem : NSMenuItem = NSMenuItem()awakeFromNib
This is our entry point for the entire application. Technically, it is actually called after our interface/window has been loaded. This is where we handle some of the initializations needed.
override func awakeFromNib() {
    theLabel.stringValue = "You've pressed the button \n \(buttonPresses) times!"

    //Add statusBarItem
    statusBarItem = statusBar.statusItemWithLength(-1)
    statusBarItem.menu = menu
statusBarItem.title = "Presses"We are actually asking our statusBar object to create a statusItem for us. This is why we did not need to initialize this variable in the section above. Normally, this method accepts a different value than -1, but there is currently a bug in Xcode that doesn’t let us do that. You can read more about it over here:
http://stackoverflow.com/questions/24024723/swift-using-nsstatusbar-statusitemwithlength-and-nsvariablestatusitemlength
Next, we give the statusBarItem our menu that we are building, and give it a title. You can give NSStatusItems other things such as images and tooltips. I encourage experimentation on your own :)
    //Add menuItem to menu
    menuItem.title = "Clicked"
    menuItem.action = Selector("setWindowVisible:")
    menuItem.keyEquivalent = ""
menu.addItem(menuItem)More on the menuItem.action later in the tutorial.
buttonPressed
What we want to do is increment a counter when the button is pressed.
Sounds crazy right? I decided to do this for the sake of the tutorial to show concurrency between our OSX window and the status bar. I encourage you to do something more interesting than what I did ;)
@IBAction func buttonPressed(sender: NSButton) {
    buttonPresses+=1
    theLabel.stringValue = "You've pressed the button \n \(buttonPresses) times!"
    menuItem.title = "Clicked \(buttonPresses)"
    statusBarItem.title = "Presses \(buttonPresses)"
}buttonPresses = buttonPresses + 1setWindowVisible
func setWindowVisible(sender: AnyObject){
    self.window!.orderFront(self)
}Something you may want to experiment with is having a function that flips the visibility of the window by utilizing:
self.window?.visible == trueself.window!.orderOut(self)Dock Visibility
If you run the program it would work fine, however there would be evidence of our app running in the dock.

Open the info.plist file that should be in our applications “Supporting Files” folder.
Right-Click -> Add Row
Finally for the left side select “Application is an agent (UIElement)” and set the value to true on the right side. It should look like this:

One more thing….
func applicationDidFinishLaunching(aNotification: NSNotification?) {
    self.window!.orderOut(self)
}I’d love if someone could enlighten me about why the window was not loaded yet in the awakeFromNib function.
Conclusion
Well, that was REALLY cool! We have a working menubar app with an interactive window associated with it.
I believe its helpful to think of what sort of things you ALWAYS want to be aware of, and try writing an app for that. An example, it would be cool if I knew how much time I spent blogging or if certain people come online in forum’s I use.
Something that I did not address was always launching this app on startup. I’ll leave that one up to you guys!
I hope you enjoyed! Let me know if you have any ideas for things that I can write tutorials about. In the meantime, enjoy learning Swift like I am!
How I used Swift to put Reddit JSON in an iOS device
A buddy of mine suggested I try to parse the JSON from Reddit to a table view as an exercise today. I thought this seemed reasonable way to learn Swift and he wanted to use the code for some project. Everybody wins.
I have only been doing Swift for a couple days now and never did Objective-C. I am obviously no expert, and am learning new things every day. I will not be going into the gory details as I am still figuring them out myself. I will however be highlighting gotcha’s and things I learned along the way about Swift.
Anyways onto the geeky stuff…
Setting up our project
The first thing you are going to want to do is setup your project with Xcode 6. I’m using beta 4 for this tutorial.
File -> New -> Project
We are making an iOS application, single view, with the Swift language.
Next double click on Main.storyboard. This is our window.
Show the document outline. There is a little handle in the lower left window of the storyboard to do this.
Highlight our View Controller for this scene, and navigate to the attributes inspector.
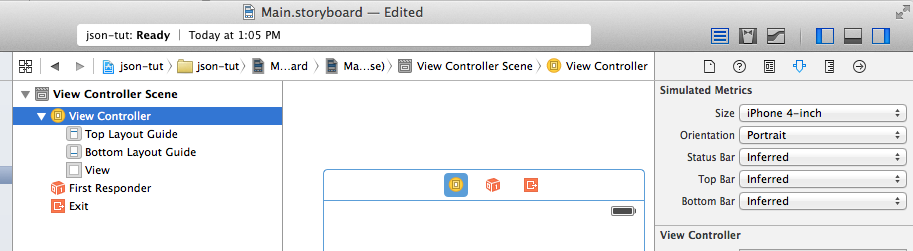
For this particular project, and because I have an iPhone 4S, I’m going to set the size to be “Retina 4-Inch Full Screen” and I’m going to set my Orientation to Portrait.
This will reduce the number of surprises we will get.
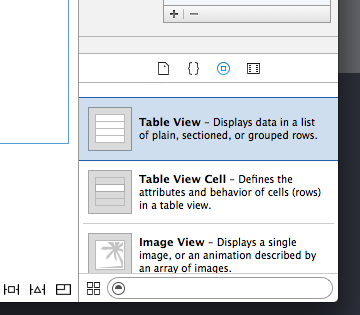
Creating our Table View
From the bottom of the left side of our screen, we want to select the Table View, and drag it into our storyboard. Resize to taste.
Next we want to right click, and drag from the Table View to our View Controller. Its the little yellow Icon under our view. Select “dataSource” and then make a second right-click-drag and select “delegate” as well.
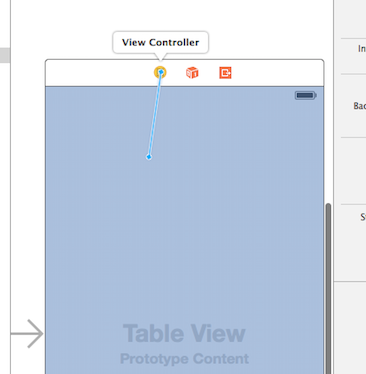
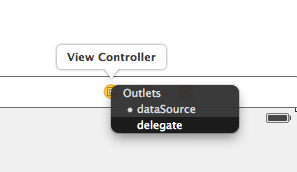
This is going to affect which functions need to be implemented in our view controller.
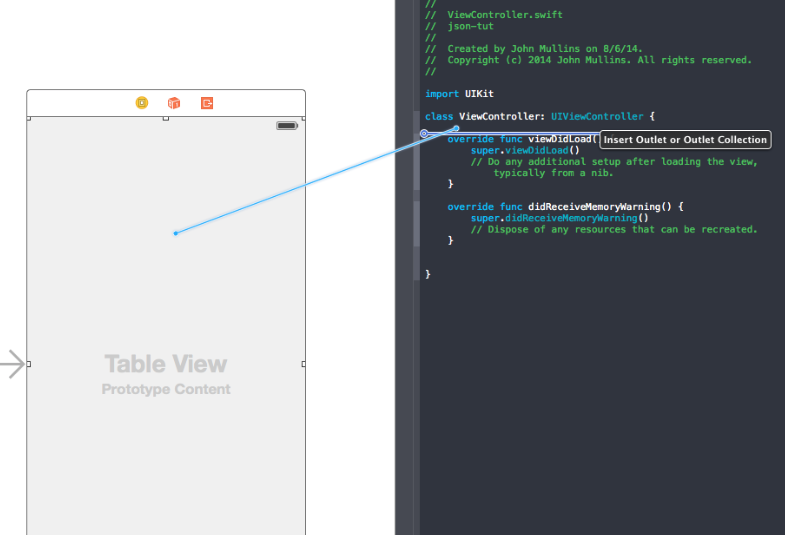
Finally, open up your ViewController.swift and drag the table view into the actual source file.
Setting up the ViewController code
Here is my TL:DR code…
import UIKit

class ViewController: UIViewController, UITableViewDataSource, UITableViewDelegate {

    var tableData = []
    @IBOutlet weak var redditListTableView: UITableView!

    override func viewDidLoad() {
        super.viewDidLoad()
        // Do any additional setup after loading the view, typically from a nib.
        getRedditJSON("http://www.reddit.com/.json")
    }

    func getRedditJSON(whichReddit : String){
        let mySession = NSURLSession.sharedSession()
        let url: NSURL = NSURL(string: whichReddit)
        let networkTask = mySession.dataTaskWithURL(url, completionHandler : {data, response, error -> Void in
            var err: NSError?
            var theJSON = NSJSONSerialization.JSONObjectWithData(data, options: NSJSONReadingOptions.MutableContainers, error: &err) as NSMutableDictionary
            let results : NSArray = theJSON["data"]!["children"] as NSArray
            dispatch_async(dispatch_get_main_queue(), {
                self.tableData = results
                self.redditListTableView!.reloadData()
            })
        })
        networkTask.resume()
    }

    override func didReceiveMemoryWarning() {
        super.didReceiveMemoryWarning()
        // Dispose of any resources that can be recreated.
    }

    func tableView(tableView: UITableView!, numberOfRowsInSection section: Int) -> Int {
        return tableData.count
    }

    func tableView(tableView: UITableView!, cellForRowAtIndexPath indexPath: NSIndexPath!) -> UITableViewCell! {
        let cell: UITableViewCell = UITableViewCell(style: UITableViewCellStyle.Subtitle, reuseIdentifier: "MyTestCell")
        let redditEntry : NSMutableDictionary = self.tableData[indexPath.row] as NSMutableDictionary
        cell.textLabel.text = redditEntry["data"]!["title"] as String
        cell.detailTextLabel.text = redditEntry["data"]!["author"] as String
        return cell
    }
}viewDidLoad()
    override func viewDidLoad() {
        super.viewDidLoad()
        // Do any additional setup after loading the view, typically from a nib.

        getRedditJSON("http://reddit.com/.json")
    }
viewDidLoad acts as the entry point into our view controller. We can think of this as main() is it is executed as soon as our view loads. You can see I added to the function our call to getRedditJSON(“http://reddit.com/.json") which is the front page of reddit in JSON format. Lets just jump to that function.
getRedditJSON()
func getRedditJSON(whichReddit: String){
        let session = NSURLSession.sharedSession()
        let url: NSURL = NSURL(string: whichReddit)
In order to make network calls we need to grab an instance of NSURLSession.sharedSession. It acts as an intermediary between all network calls that our iOS device can make.
I also setup an NSURL for the reddit we want to visit. All library calls I’ve seen to the Cocoa framework start with NS. NS stands for NeXTSTEP which was the original name for OSX before Apple bought it :)
https://en.wikipedia.org/wiki/NeXTSTEP
let networkTask = mySession.dataTaskWithURL(url, completionHandler : {data, response, error -> Void in
The function dataTaskWithURL accepts (as you would guess) a url and a task. Here you can see Swift closures in action on dataTaskWithURL’s completionHandler. completionHandler is what gets called after the network action has completed. The task is defined in a closure. The typical syntax for a closure this is:
{(par,am,meters) -> returnType in
    //code
    //code
    //code
}
Closure’s can do some pretty powerful things. I definitely recommend googling this as well, but for right now just know that its basically like setting up an inline function.
It should also be worth noting, that for clarity, you can set closures to variables, and just pass the variable instead of defining the closure like that. In encourage you to try to refactor this code to do this.
    var err: NSError?
    var theJSON = NSJSONSerialization.JSONObjectWithData(data, options: NSJSONReadingOptions.MutableContainers, error: &err) as NSMutableDictionary
Here is where the real magic happens. Thanks to Cocoa, we can use NSJSONSerialization’s class and call its JSONObjectWithData function. In this case I am using an NSMutableDictionary. The difference between an NSDictionary and this is I can modify the values. We are not going to be modifying anything in this example, but this is helpful if we need to remove a null object.
let results : NSArray = theJSON["data"]!["children"] as NSArray
We want to know how many entires there are and we would like to split this into an array of dictionaries we can use.
It is interesting to note that without the ! in this statement, we can bring Xcode to a full crash (at least in beta4). I believe the ! acts as try() would in ruby.
    dispatch_async(dispatch_get_main_queue(), {
        self.tableData = results
        self.redditListTableView!.reloadData()
    })
At the end of this function, we are kicking off a thread to update the tableData with the latest results, and we tell the table view to reload its data. This calls our method: func tableView(tableView: UITableView!, cellForRowAtIndexPath indexPath: NSIndexPath!) -> UITableViewCell! {
networkTask.resume()
Finally, after we set up this networkTask, we start it with a call to resume()
Now lets look at the functions we implemented from UITableViewDataSource
numberOfRowsInSection
func tableView(tableView: UITableView!, numberOfRowsInSection section: Int) -> Int {
        return tableData.count
}
This function tells our table view how many rows it should make. In this case we are using the tableData’s count. We set up this number when we called our dispatch earlier.
cellForRowAtIndexPath
func tableView(tableView: UITableView!, cellForRowAtIndexPath indexPath: NSIndexPath!) -> UITableViewCell! {
    let cell: UITableViewCell = UITableViewCell(style: UITableViewCellStyle.Subtitle, reuseIdentifier: "MyTestCell")
The interesting thing about this function that I learnt via println debugging, is this function is actually called whenever the view is updated. Also it tends to render things slightly out of view. So when you slide this list up and down, it will always render one of the items that you can’t see in whatever direction you are scrolling.
Think about apps that slow down considerably when you are scrolling really fast. This is because this function is being called for every cell as you scroll.
If the goal of your application is to be responsive, then everything done in here should take advantage of Grand Central Dispatch to populate the data asynchronously. You may also want to think about caching data if you plan on making network calls in here.
For the purposes of this tutorial I am not going to be doing this, but you certainly should read up on this topic.
It is also worth noting the style of cell we are using is “Subtitle” which gives up a subtitle entry per list. In this case I’m going to make the big text the title of the reddit entry and make the detail (subtitle) text the author.
    let redditEntry : NSMutableDictionary = self.tableData[indexPath.row] as NSMutableDictionary
    cell.textLabel.text = redditEntry["data"]!["title"] as String
    cell.detailTextLabel.text = redditEntry["data"]!["author"] as String
    return cell
}
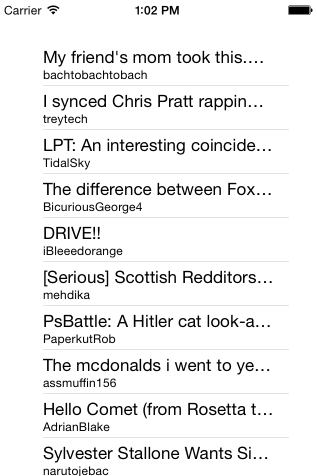
And thats about it :)
Here is what the finished product looks like running in iOS simulator:
Much can be done to this application to make it better. We can do a lot more verbose error checking. We can handle null values of the redditEntry better. We can cache and load thumbnails of the reddit threads. I will leave this as an exercise for you to figure out.